
Clean Water Anywhere — Our Ultimate RV Water Filtration Setup

In this post, we’ll show how we built a simple but powerful RV water filtration system and softening system for our Jayco North Point 310RLTS that delivers bottled-water quality right from the tap. We’ll walk through what we used, how it works, and why it’s made the biggest difference in our everyday RV life.
When We Realized One Little Filter Wasn’t Enough
When we first started RVing, we used the same inline filter most RVers do — the small blue Camco TastePURE that connects directly to your freshwater hose. It was easy, cheap, and quick to set up.
But after visiting different campgrounds across the country, we quickly noticed the water quality changed everywhere we went. Some parks had great city water. Others had well water that smelled odd, tasted metallic, or left behind visible sediment. Even with the Camco filter, the water sometimes just didn’t feel clean.
We wanted better — not just for taste, but also for peace of mind. We wanted to protect our RV’s plumbing and appliances from calcium and iron buildup, while knowing the water we used every day was safe and clean.
Our 4-Stage Water Filtration + Softener Setup

After a little research (and a lot of trial and error), we built a system that’s powerful, reliable, and still easy to maintain.
We use four SimPure Whole House Water Filter housings, each with a different filter stage, followed by an On The Go OTG4-DBLSOFT 16,000-Grain Portable Water Softener.
Here’s how our system works:
We set up the four filters on the ground beneath our wet bay and connect the softener after the filtration stages. This ensures all sediment is removed before the softener processes the water, protecting it from buildup and prolonging its life.
It took less than an hour to build the system initially — just good plumber’s tape, solid fittings, and a few test runs to ensure no leaks. Now, with solid brass garden hose quick-connects on every hose, setup and teardown take only a few minutes each.
Want to Build a System Like This?

If you’re interested in creating your own RV water filtration setup, these two YouTube videos were a big source of inspiration for us. Both walk through the process step-by-step and help you understand how to safely and effectively filter campground water.
Check out these resources:
How to Build a Cheap and VERY Good RV Water Filter — DIY Water Filter — Make RV Park Water Safe by Today We Go
Best Setup for a 3 Stage Filter and Soft Water System for Your RV | Newell School by RV Squared
These videos provide excellent visuals and instructions for assembling your own water filtration system. We used similar principles but expanded ours into a four-stage filtration process with a built-in water softener — giving us even cleaner, better-tasting, bottled-water-quality results.
Parts We Used to Build Our Water Filtration System

If you’re interested in building a setup like ours, here’s the complete list of parts and components we used. Each product below can be found on Amazon (affiliate links coming soon).
(4x) SimPure Whole House Water Filter Housings – Durable housings that hold each of the four filtration stages.
20 Micron Sediment Filter – Membrane Solutions – Captures large particles like sand, rust, and dirt.
5 Micron Sediment Filter – PUREPLUS – Traps smaller sediment for cleaner water.
1 Micron Carbon Block Filter – PUREPLUS – Removes fine particles, chlorine, and odor.
0.5 Micron Carbon Block Filter – SpiroPure – Provides the final polish for clear, great-tasting water.
On The Go OTG4-DBLSOFT Portable 16,000-Grain RV Water Softener – Removes calcium and magnesium to prevent scale buildup and protect plumbing.
(3x) HQMPC Garden Hose Quick Connect Solid Brass Connectors (3/4” GHT) – Allows fast, leak-free setup and teardown with your hoses.
(2x) TAISHER Brass Pipe Fitting Reducer Adapters (3/4” Male Pipe x 3/4” Male Pipe) – Solid brass adapters for connecting the housings and fittings securely; provides a durable, leak-proof connection.
Teknor Apex Zero-G 25’ RV/Marine Drinking Water Hose (½” ID, Blue) – Connects the campground spigot to the first filter housing; lightweight, flexible, and kink-resistant.
(2x) Camco EVOFlex 4-Ft RV Drinking Water Hose (5/8” ID) – Lead-free, BPA-free, phthalate-free hoses that are flexible and safe for potable water.
Everyday Results That Speak for Themselves

Our full water test strip results, compared to the official chart. Everything came back clean and within ideal ranges — including low hardness, low chlorine, zero lead, and balanced pH.

Our filtered water measured at 205 ppm on the TDS meter — a solid reading for safe, clean drinking water. For reference, 200–500 ppm is considered safe and normal for drinking water, so a TDS reading of 205 is right in the ideal range.
Since switching to this setup, the difference has been night and day.
Taste & Smell: No more strange odors or odd tastes — the water now tastes nearly as good as bottled water.
Shower & Dishes: No more calcium or lime buildup on our shower glass or dishes. Everything stays clear and clean.
Peace of Mind: We know we’re getting clean, safe water from any campground hookup, no matter the source.
We also ran a dedicated line from our filtration system to our fridge’s water dispenser and ice maker. That line includes a small mineral filter to add back trace minerals for taste — and the fridge itself filters one last time before dispensing. The result? Cold, crisp water and ice every single time.
Filter & Softener Maintenance
We keep maintenance simple by replacing all four filters every six months. Even though some could go longer, changing them together keeps everything on the same schedule.
Filter replacement: Every 6 months (4 months if traveling through hard-water regions).
Softener back rinse: Every 3 months.
Softener recharge: Every 6 months using 2 boxes of table salt (less than $2 total).
On average, our yearly cost for filters and salt is around $53. That’s less than many RVers spend replacing inline filters every few months.
Good, Better, Best: Choosing the Right Water Filtration Setup
Even if you don’t go all-in on a four-stage setup like ours, any filtration between your RV and the campground spigot is better than nothing. That one step can save your plumbing, improve taste, and protect your health.
Comparison: Our Setup vs. Common RV Filters
Because we use solid brass garden hose quick-connect fittings on every line, our system connects and disconnects in minutes — clean, fast, and leak-free. What used to be a one-hour build project is now a simple five-minute setup at each campground.
Is It Worth It? Absolutely.
What Our Filters Look Like After 6 Months

These are our filters after six months of use — the system clearly does its job.
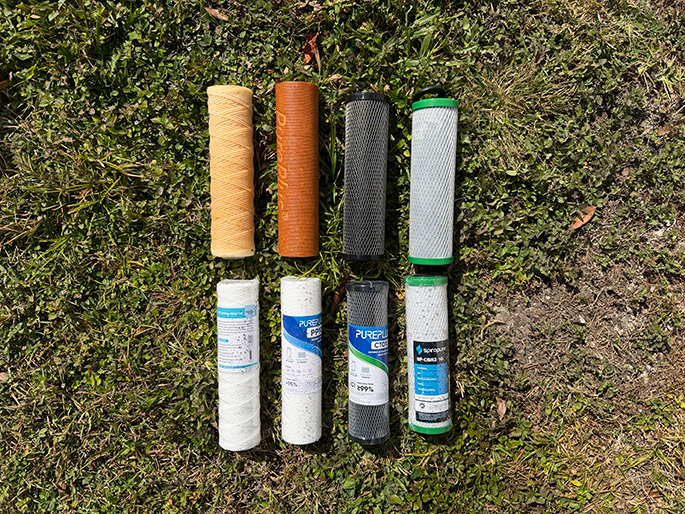
Side-by-side comparison of our used filters (top) versus brand new ones (bottom). This visual alone shows how much sediment, minerals, and contaminants our system removes.
This setup isn’t tiny — it takes a bit of space in our basement during travel days — but the benefits far outweigh that tradeoff.
We no longer buy bottled water except in rare situations (like when park water is temporarily shut off). The water from our system is clear, great-tasting, and reliable. Plus, we’ve noticed a complete lack of scale or buildup on faucets and glass — something that plagued us early on.
We’ve had neighbors ask about it more than once, usually when they see the setup on the ground next to the RV. Once they hear the details, the reactions are usually the same: “That makes a lot of sense.”
Final Thoughts: Clean Water Anywhere
Safe, clean, great-tasting water shouldn’t be a luxury on the road. Whether you choose a simple inline filter or a multi-stage setup like ours, the key is to always use something between your RV and the campground water source.
For us, this build has been one of the most rewarding projects we’ve done to make RV life more comfortable — and it’s paid for itself many times over in savings, convenience, and peace of mind.
If you have questions about water quality or want help designing your own RV filtration setup, drop a comment — we’re always happy to help.
Affiliate Disclaimer: Some of the links in this post are affiliate links. This means if you purchase through them, we may earn a small commission at no extra cost to you. We only recommend products we personally use and trust. Supporting us this way helps keep VNR Adventures rolling and allows us to continue sharing our journey.
Author’s Note
We’re Robert and Vahn, the team behind VNR Adventures. Robert is the planner, tech-savvy DIYer, and the one who climbs onto the roof with tools in hand. Vahn is the designer, chef, and lover of all things local who makes sure every stop feels like home. Together, we’re exploring the country one campground at a time while sharing the honest side of RV life — the wins, the challenges, and everything in between.
Our goal is simple: to be a trustworthy resource for anyone curious about this lifestyle. We don’t sugarcoat the costs or frustrations, but we also celebrate the freedom and joy that come with it. Thanks for being here and following along with our journey.

This post is part of our RV Life 101 series — a beginner-friendly guide to the essentials of RV living.
👉 See all RV Life 101 posts here